Showing posts with label android. Show all posts

Monday, July 14, 2014

How to integrate your Android app with the CodeRed launcher

What is CodeRed?

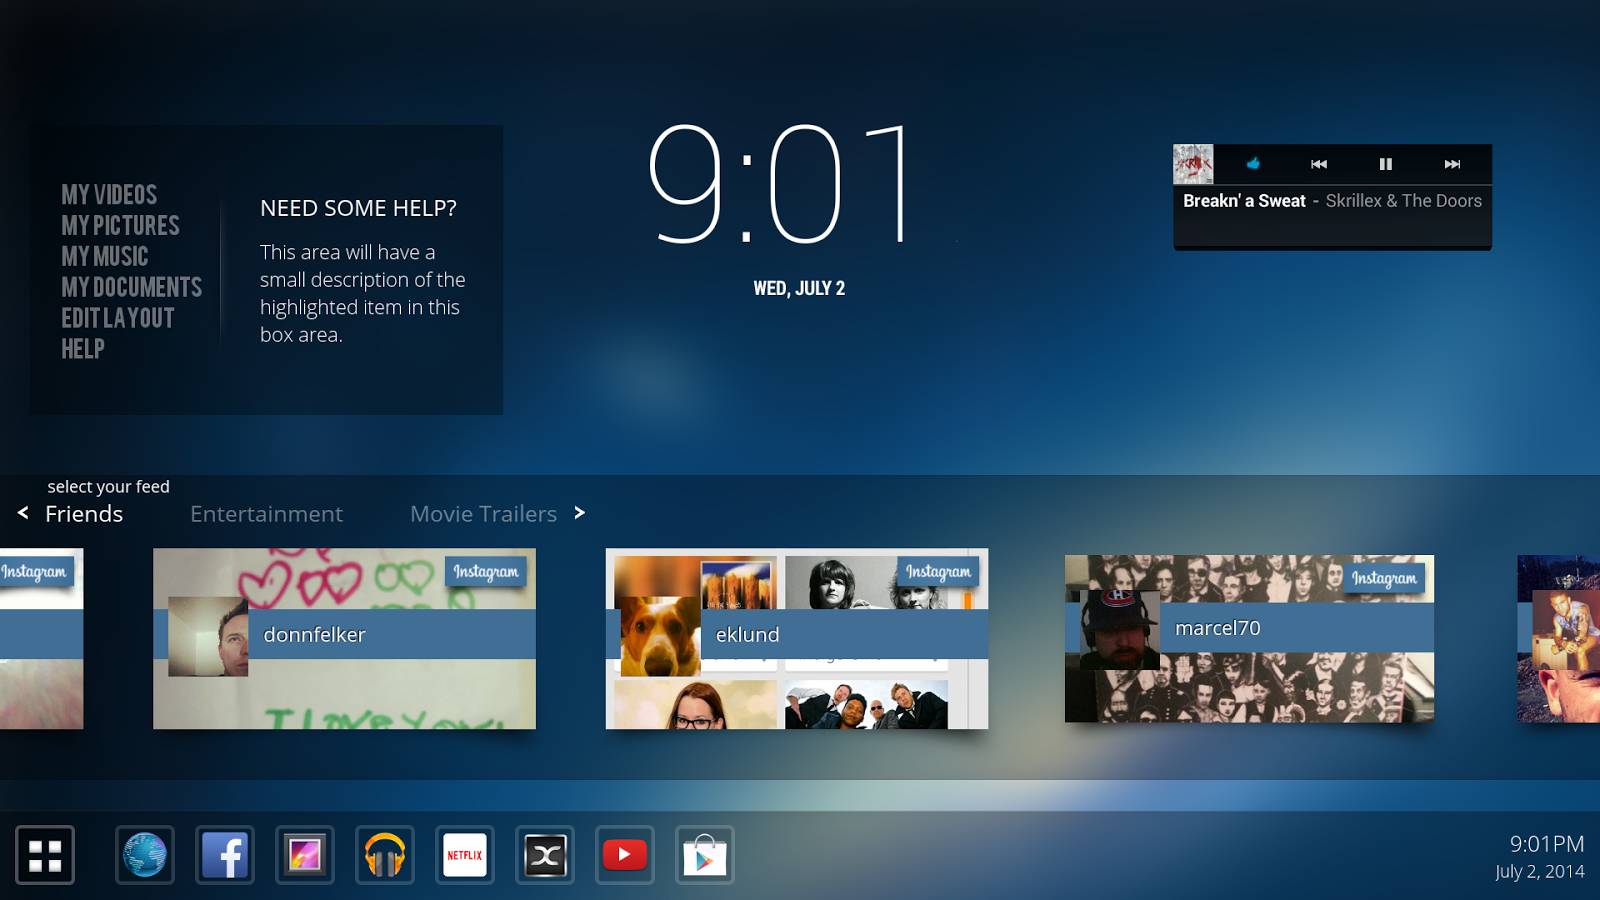
CodeRed is an ambitious new Android TV box launcher with a strong emphasis on simplicity, beauty and flexability.  One of the really cool features of the CodeRed launcher is it's plugin architecture for it's Film strip control.  The launcher comes packaged with several Film strip plugins that provide content for the film strip, such as Youtube, Facebook, Vimeo, Instagram and Vine.  But it doesn't stop there.  With the CodeRed API it's quick and easy for anyone to integrate and provide content for the CodeRed film strip.

NOTE: Since the CodeRed launcher hasn't been released yet, if you'd like a test build to play with and use to test your apps integration with it, please email me at robwoods.edbrock@gmail.com and I'll send you the latest build and provide any support you need to get your plugin working.  Also, this isn't the final code for the API, there won't be any major changes, but there will be a few small changes I'll need to make before the final release such as a versioning system.

Overview

In what scenarios would you want to provide content to the CodeRed launcher?  Here are a couple of possibilities..

1. You maintain an app that provides your users with video content from the internet and would like this content to be easily accessible on a TV using an Android TV box.  When a users selects your video on the CodeRed launcher, it starts streaming immediately without even running your app.
2. You maintain an app that contains it's own local content that you'd like presented to the user on a TV directly from the launcher.  When a user selects your content in the launcher, it launches that content directly in your app.
3. Some combination of the above 2 scenarios.  For example, perhaps the content you are exposing to the CodeRed launcher requires further processing before streaming.  You could provide presentation content to the launcher and when the user selects your content, your app is invoked and any further processing can take place before playing the content.

Before I go into detail explaining how you can integrate with the CodeRed launcher, I will describe what is involved behind the scenes.  Before I get into it, I'd like to thank Roman Nurik for sharing his very clever pattern for publishing and subscribing to content between 2 apps using IntentService.  We are using a very similar pattern in the CodeRed launcher for allowing others to publish content to the launcher.  You can see Roman's awesome live wallpaper app on GitHub here.

The concept is actually very simple.  The CodeRed launcher has implemented a subscriber IntentService that handles incoming requests from apps that want to publish content to the launcher.  In turn, an app that wants to publish content is doing so by subclassing an IntentService based class (from the CodeRed API) and implementing the onTryUpdate() method.  I'll go into more detail to help with the specific implementation later, but that is the basic  flow.

Lets get started


  1. You'll need the CodeRed API library first.  You can get it here.
  2. Copy this library to your apps libs folder or link the CodeRed API library project to your project in Eclipse.  Now you should have access to the CodeRed API in your app.
  3. Create a new subclass of RemoteCodeRedFilmSource.
  4. Override and implement the onTryUpdate(int reason) method.  This is the only method that you need to implement.  In this method you will need to prepare your content and create a list of FilmItem's.  FilmItem is a data object that is part of the CodeRed API.  Inside the FilmItems are various data members that describe your content, including title, description, thumbnail Uri, content Uri and an Intent.  There's also support for some branding elements, but I'll talk about them in another blog post.  Most of the elements of a FilmItem are pretty self explanatory, however, the Intent is an interesting one.  In order for a user to actually do something with your content in the launcher, you will either need to supply a content Uri or an Intent.  If you supply a content Uri, when the user selects it, the launcher will launch an Intent with ACTION_VIEW and use the Uri you supplied.  If this is a video stream, then a video player should handle it, if it's an http link then the web browser should handle it, etc.

    If you supplied an Intent, then instead of the launcher letting the OS decide what to do with your content, you can specify exactly what you want to happen by supplying a specific Intent.  So, for example if you want your app to be invoked specifically when a user selects your content, you should provide an Intent that launches your app specifically with whatever extra data is required.

    Don't forget to call scheduleUpdate(long timeInMillis) as the last thing you do.  This ensures that your plugin will continue to publish new data to the launcher at the interval you specify.
  5. There is one last step that is required.  You need to update your apps Manifest file with some information that will allow the CodeRed launcher to know that you have implemented a plugin with the CodeRed API.  All you need to do is add this specific action to your IntentServices definition in your Manifest.

    <intent-filter>
         <action android:name="com.brockoli.android.codered.api.CodeRedFilmSource" />
    </intent-filter>

Here is a complete example showing how to provide trending Youtube videos to the CodeRed launcher.

public class YoutubeFilmSource extends RemoteCodeRedFilmSource {
    private static final String TAG = LogUtil.makeLogTag(YoutubeFilmSource.class);
    private static final String SOURCE_NAME = "Youtube videos";

public YoutubeFilmSource() {
super(SOURCE_NAME);
}

@Override
protected void onTryUpdate(int reason) throws RetryException {
        List<FilmItem> currentFilms = getCurrentFilms();
        JSONObject jsonObject;
        ArrayList<FilmItem> films = new ArrayList<FilmItem>();
     
        try {
            jsonObject = IOUtil.fetchJsonObject(getString(R.string.youtube_videos_url));
JSONObject jsonFeed = jsonObject.getJSONObject("feed");
JSONArray entries = jsonFeed.getJSONArray("entry");
for (int i=0; i < ((entries.length() > 20) ? 20 : entries.length()); i++) {
JSONObject entry = entries.getJSONObject(i);
JSONObject mediaGroup = entry.getJSONObject("media$group");
JSONArray thumbnails = mediaGroup.getJSONArray("media$thumbnail");
JSONObject description = mediaGroup.getJSONObject("media$description");
JSONArray links = entry.getJSONArray("link");
JSONObject title = entry.getJSONObject("title");

Intent intent = new Intent(Intent.ACTION_VIEW);
intent.setData(Uri.parse(links.getJSONObject(0).getString("href")));
intent.putExtra("force_fullscreen",true);

FilmItem film = new FilmItem.Builder()
.title(title.getString("$t"))
.byline(description.getString("$t"))
.thumbUri(Uri.parse(thumbnails.getJSONObject(0).getString("url")))
.contentUri(Uri.parse(links.getJSONObject(0).getString("href")))
.viewIntent(intent)
.build();

films.add(film);
}
        } catch (JSONException e) {
            LOGE(TAG, "Error reading JSON", e);
            throw new RetryException(e);
        } catch (IOException e) {
            LOGE(TAG, "Error reading JSON", e);
            throw new RetryException(e);
        }

        if (films != null && currentFilms != null && films.equals(currentFilms)) {
            LOGD(TAG, "Skipping update of same content.");
        } else {
            LOGD(TAG, "Publishing content update: " + films);
            if (films != null && jsonObject != null) {
            LOGD(TAG,"Youtube film source publishing films to launcher");
                publishFilms(films);
            }
        }
        // show the latest photo in 30 minutes
        scheduleUpdate(System.currentTimeMillis() + 30 * 60 * 1000);
    }
}

Monday, January 30, 2012

Android Design Tip: Drop shadows on ListViews

Today the designer on my project showed me a comp with a nice drop shadow between two views that gives the illusion that one is sort of behind the other after an animation is run to reveal it.  He gave me a nice 9 patched image file to use, nothing to it right?  Well, not exactly.  So the the view that the drop shadow is meant to be applied to contains a ListView.  And the drop shadow is a narrow vertical line running down the right hand side of the ListView.

Failed attempt #1: Add an ImageView in my layout with the ListView such that it's aligned with the parents top, right and bottom.  And thinking I was being clever, I even added it last in my layout, so it would be "on top".  Well for most views this is probably good enough, but when I ran it, I couldn't see my drop shadow.  You may have already guessed why.  The list item views in my ListView are drawn last, over top of my drop shadow.

So after a bit of reading up on ListView and well AdapterView in general.  I found the method I needed to override.  dispatchDraw(Canvas).  This allows us to draw whatever we want over top of our AdapterView after all it's child views have been drawn!

So long story short, just sub class ListView and override dispatchDraw(Canvas) to get the desired effect.  First, here is a screen cap of my result.

What I ended up doing is creating some custom attributes for left, right, top, bottom as booleans to indicate if a drop shadow should be drawn, then also which drawable to use for each side.  Here is my attrs.xml


And here is my custom ListView subclass.
public class DropShadowListView extends ListView {

    private static final int LOC_LEFT = 0;
    private static final int LOC_TOP = 1;
    private static final int LOC_RIGHT = 2;
    private static final int LOC_BOTTOM = 3;

    private int mDropShadowRightId;
    private int mDropShadowLeftId;
    private int mDropShadowTopId;
    private int mDropShadowBottomId;

    private boolean mDropShadowRight;
    private boolean mDropShadowLeft;
    private boolean mDropShadowTop;
    private boolean mDropShadowBottom;

    public DropShadowListView(Context context, AttributeSet attrs) {
        super(context, attrs);

        TypedArray a = getContext().obtainStyledAttributes(attrs, R.styleable.DropShadowListView);

        mDropShadowRightId = a.getResourceId(R.styleable.DropShadowListView_dropShadowRightSrc, -1);
        mDropShadowLeftId = a.getResourceId(R.styleable.DropShadowListView_dropShadowLeftSrc, -1);
        mDropShadowTopId = a.getResourceId(R.styleable.DropShadowListView_dropShadowTopSrc, -1);
        mDropShadowBottomId = a.getResourceId(R.styleable.DropShadowListView_dropShadowBottomSrc, -1);

        mDropShadowRight = a.getBoolean(R.styleable.DropShadowListView_dropShadowRight, false);
        mDropShadowLeft = a.getBoolean(R.styleable.DropShadowListView_dropShadowLeft, false);
        mDropShadowTop = a.getBoolean(R.styleable.DropShadowListView_dropShadowTop, false);
        mDropShadowBottom = a.getBoolean(R.styleable.DropShadowListView_dropShadowBottom, false);
    }

    /*
     * (non-Javadoc)
     * 
     * @see android.widget.ListView#dispatchDraw(android.graphics.Canvas)
     */
    @Override
    protected void dispatchDraw(Canvas canvas) {
        super.dispatchDraw(canvas);

        Bitmap bm;
        if (mDropShadowRight) {
            bm = getBitmap(mDropShadowRightId);
            canvas.drawBitmap(bm, null, getDropShadowArea(LOC_RIGHT, canvas, bm), null);
        }

        if (mDropShadowLeft) {
            bm = getBitmap(mDropShadowLeftId);
            canvas.drawBitmap(bm, null, getDropShadowArea(LOC_LEFT, canvas, bm), null);
        }

        if (mDropShadowTop) {
            bm = getBitmap(mDropShadowTopId);
            canvas.drawBitmap(bm, null, getDropShadowArea(LOC_TOP, canvas, bm), null);
        }

        if (mDropShadowBottom) {
            bm = getBitmap(mDropShadowBottomId);
            canvas.drawBitmap(bm, null, getDropShadowArea(LOC_BOTTOM, canvas, bm), null);
        }
    }

    /**
     * Get the correct bitmap from context resources
     * 
     * @param id
     *            Resource id
     * @return Bitmap to draw on the view
     */
    private Bitmap getBitmap(int id) {
        return BitmapFactory.decodeResource(getContext().getResources(), id);
    }

    /**
     * Get the Rect to draw the Bitmap in
     * 
     * @param loc
     *            Left, Top, Right or Bottom (0,1,2,3)
     * @param canvas
     *            The canvas to we're drawing on
     * @param bm
     *            The bitmap we're drawing
     * @return Rect for the area we are drawing the Bitmap onto the canvas
     */
    private Rect getDropShadowArea(int loc, Canvas canvas, Bitmap bm) {
        switch (loc) {
            case LOC_LEFT :
                return new Rect(0, 0, bm.getWidth(), canvas.getHeight());
            case LOC_TOP :
                return new Rect(0, 0, canvas.getWidth(), bm.getHeight());
            case LOC_RIGHT :
                return new Rect(canvas.getWidth() - bm.getWidth(), 0, canvas.getWidth(), canvas.getHeight());
            case LOC_BOTTOM :
                return new Rect(0, canvas.getHeight() - bm.getHeight(), canvas.getWidth(), canvas.getHeight());
            default :
                return null;
        }
    }
}


And finally you can create this custom ListView in xml like this.


Wednesday, November 30, 2011

Irregular ActionBar

So you've been working with the Honeycomb API's for a while and are comfortable with the new ActionBar.  Then your designer sends you this visual design...


Can you spot what is going on in that screenshot?  ActionBar is the rectangular area at the top of your Honeycomb app where you can put things like tabs, menus, drop down lists, etc.  But for all the styling you can apply to your ActionBar, it's still a rectangle.  If you want to add a bit of flare to your ActionBar and break out of that rectangular box.  Here's a neat trick.

Your visual designer just sent you the background resource for your apps ActionBar, and it's got some irregularities to it's shape, with some transparency and they expect your frame content to seamlessly scroll behind your ActionBar.  Here's what you do.

Step 1: Send it back and tell them the ActionBar is a rectangle! This rarely works.

Step 2: Bring the image into your favorite image editing software (I use Gimp).  Now you want to cut the image horizontally and save the top (rectangular) portion in one image file, and the bottom irregular portion in a second image file.

ActionBar header top (header_top.png)

ActionBar header bottom (header_bottom.png)
Step 3: Create a custom style that uses Widget.Holo.ActionBar as it's parent and set the header_top.png as the background drawable for your ActionBar.  Then make sure you add your style as a theme to your manifest file under application (android:theme="@style/MyTheme")  So far nothing too special, you've set a background image for your ActionBar.

(res/values/styles.xml)


Step 4: Modify your content layout file to include the bottom part of the ActionBar as an ImageView and use android:layout_alignParentTop="true" to make sure it is "attached" to the top of your parent view and looks like it's part of your ActionBar.  Note that your parent layout will need to be a RelativeLayout in order for this to work.

Now, if you run your app and you can't see the bottom part of the ActionBar that you just added, you probably put your ImageView before your content in your layout.  Even though you've told your ImageView to alignParentTop, if you create it before your content view, it will be covered up and you actually want it to be drawn last in your view.  So move it to be the last view in your layout.  That should do it!  Check out your awesome irregular ActionBar!

(res/layout/main.xml)


Credit to my designer Stefan for the awesome idea!

Saturday, August 20, 2011

Renderscript: Components of a 3d scene

For anyone looking into renderscript who has never done any 3d graphics before, this is for you!  There is a lot of new terminology, and a whole lot of math involved.  Scared yet?  Don't be, the set of components involved in rendering a 3d scene is finite and well defined.

Rendering Pipeline
Rendering a scene simple means that you are transforming a 3D field of objects into a 2D image.  I found this easy to understand drawing that should help you to visualize the rendering pipeline.  Credit to these Waterloo university course notes here.


Models
This is what it's all about.  Objects in a scene, comprised of primitives.  There is some key terminology used when we discuss how to build an object in 3d space.

  • Plane This is a a one dimensional slice in space that runs along one of three axis, x, y, or z.
  • Coordinate This is an element that is used to describe a precise point in a single plane.
  • Vertex This is a set of coordinates that are used to describe a precise point in a 3d space.  A vertex is described in the x, y, and z planes.  Typically x represents the horizontal plane, y represents the vertical plane and z represents the depth plane.
  • Primitive A primitive is an atomic geometric object.  ie: points, planes, lines, circles, triangles, spline curves.  For more on primitives see this wiki page.
An object is composed of a set of vertices, and a type of geometric primitive that describes how the vertices should be connected to make a shape.

A models coordinate system (MCS) needs to be transformed into your worlds coordinate system (WCS) using a model transformation matrix.

A 3D world scene will contain your entire scene.  However, the user may not need to see your entire scene on their device.  In order to see smaller sections of your world scene, you need to create a view scene by transforming your world scene to your view scene using a view transformation matrix.  This is a transformation from your WCS to your view coordinate system (VCS).

In order to display your 3D view of your scene on your 2D screen, first we need to calculate what parts of your 3D view will actually be seen.  This is done through a planer projection.  There are two types of 3D planer projections, the one we would normally be using in a renderscript context will be perspective projection.  Basically perspective projection is the idea that objects that are further away look smaller than objects that are closer to the viewer.

The components we need to define in renderscript in order to project a 3D scene onto a 2D screen are as follows:
  • Camera The camera is positioned somewhere in the 3D scene and oriented towards a particular part of the scene.  We also need to define the cameras field of view, which determines how much of the scene is seen by the camera.  In order to actually see something on your 2D screen, you will finally need to define a plane with which we project our scene through.  You can see some drawings that depict this description here.
  • Model This is your 3D model that you want projected.
  • Plane through which your camera projects your scene.
Once your scene is projected into a normalized device coordinate system (NDCS) it is ready for rasterization into the final 2D image in in your screens coordinate system (SCS).  The process of rasterization involves transforming your 2D scene into it's pixel representation on your screen.

This is just a high level view of the basics of 3D rendering, but you need to understand this before digging deeper into the details of how all of this works.  It involves a lot of complicated vector and matrix math.  For more details, have a look at these wikipedia articles.

Thursday, August 18, 2011

Renderscript: A First Look

What is Renderscript?
Renderscript is a C99 based language used for 3D rendering and compute API's at the native level on an Android device.  It's a new API provided in the Honeycomb SDK level 11.


When should I use Renderscript?
When you need a high performance graphics rendering solution in your application and/or a high performance compute language for doing resource intensive operations.  Renderscript doesn't require you to write any JNI code to interface with your renderscript code.  The interface between your renderscript and your SDK code is generated for you.  The trade offs are,  you have a reduced feature set compared to using OpenGL with the NDK and you can't allocate memory in your renderscript, it must be allocated from your SDK code.


How is it different than OpenGL?
OpenGL can be used in two different ways in Android.
  • OpenGL API's can be used to produce 3d graphics using the Android SDK.  This is a good choice when performance isn't critical and you don't need the added complexity of using the NDK.
  • OpenGL with the NDK offers you the most flexability and features of OpenGL and is a good choice for graphics intense applications.  However, you have the added complexity of the NDK and you are required to write your own JNI to use your NDK code.
Renderscript components
An app that uses renderscript is composed of three required components.


Renderscript component
This is your actual Renderscript code contained in a .rs file. Renderscript code is C99 based but only has a small set of functionality so as to ensure portability across different CPUs.  You can also create renderscript header files (.rsh) where you can define your structures and function stubs.  You can have multiple .rs and .rsh files.  You can find the provided renderscript header files in the &lt;sdk_root&gt;/platforms/android-11/renderscript directory of the Android SDK.


Reflected component
This component is set of classes generated for you by the Android build tools and are used to interface with your renderscript component.  This includes hooks to the functions and variables in your renderscript code.  Also provided are methods for allocating memory to the pointers defined in your renderscript.
For each .rs file you've created, a class will be generated with the name ScriptC_renderscript_filename. This is the java representation of your .rs that you can call from your SDK code. Code that will be reflected in this generated class is as follows:
  • Non-static functions
  • Non-static global variables are accessed with generated set_ and get_ methods, if a variable is marked as const in your renderscript, then only a get_ method is generated.  It should be noted that the last value set to a variable through the reflected set_ method, is the value that will be returned through the get_ method, even if that variable is changed inside your renderscript during execution.
  • Global pointers are accessed in the reflected component by special methods generated called bind_pointer_name. This will allocate memory for the pointer both in the SDK code and in your renderscript.
Android Framework component
This is the usual Android framework where you have access to the android.renderscript classes as well as the usual things like Activity lifecycle, touch events, etc.  You will access your renderscript from here through the reflected components.